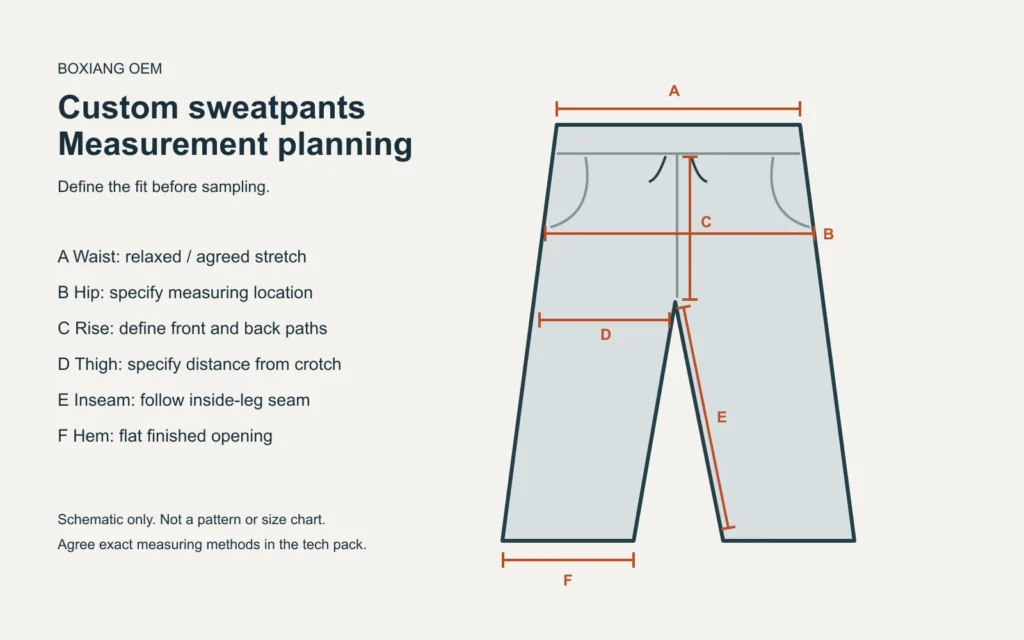
For custom sweatpants, “oversized” is a starting direction, not a complete size specification. Before requesting a sample, define the waist, rise, thigh, inseam and leg opening, then agree how each point will be measured. A clear measurement brief lets you compare the sample with your intended fit instead of judging it only from a photograph.
This guide is for clothing brands developing joggers, straight-leg sweats or wide-leg streetwear pants. It explains what to send, what to check and how to record sample changes. It does not prescribe one universal size chart: your target customer and silhouette determine the measurements.
Choose the leg shape before choosing a size label
A jogger with an elasticated cuff, an open-hem straight leg and a wide-leg sweatpant need different specifications. Start with front, side and back references. Mark which details communicate the fit you want and which are only styling, such as the shoes or how the waistband is worn.
For example, compare the grey wide-leg side-stripe reference with the graphic jogger reference. These are different development directions, not interchangeable size charts. Confirm the intended hem construction and room through the seat and thigh before asking for size grading.
Agree a consistent measurement method
Use one unit throughout the brief: centimetres or inches. Record whether a measurement is taken flat across the garment or around it. A flat waistband width is not the same number as its circumference. For elasticated areas, distinguish a relaxed measurement from a stretched measurement and agree the measurement condition with the factory.
Lay the garment flat and smooth without pulling it out of shape. Use annotated drawings or photographs to identify the start and end of each measurement. The Techpacker sizing and measuring guide explains why consistent points of measurement belong in a garment specification.
Build your sweatpants measurement brief
The illustration is a measurement key, not a pattern or a size chart. Agree the exact measuring path, including curved seams, in your own tech pack.
Swipe or scroll horizontally to read all three columns.
| Point | What to define | Why it matters |
|---|---|---|
| A Waist | Flat relaxed width, waistband height and any agreed stretched measurement. | Clarifies the starting fit and how the elastic is assessed. |
| B Hip | Flat width at an agreed distance below the waistband. | The location must stay consistent when samples are compared. |
| C Front and back rise | Separate seam paths from the crotch point to the top edge; state whether the waistband is included. | Helps communicate how high the pants sit and the intended seat shape. |
| D Thigh | Flat width at a specified distance below the crotch. | Separates leg volume from waist size. |
| E Inseam | Inside-leg seam path from crotch to finished hem. | Distinguishes leg length from the garment’s overall length. |
| F Hem opening | Flat finished opening; include cuff width and height where relevant. | Defines an open, tapered, flared or cuffed finish. |
Include outseam, knee position, pocket dimensions and placement where they affect the design. Do not rely on the six illustration labels as a complete technical specification. For a reference with contrast panels or large patches, also mark their position relative to seams and pockets.
Keep fabric decisions separate from the photograph
A loose silhouette does not establish a particular fiber composition or GSM. Request the material structure, weight, hand feel and color you need. If you are considering loopback French terry or brushed fleece, use our French terry and fleece comparison to understand the basic construction difference, then assess an actual swatch for the pants project.
Agree whether measurements will be approved before or after the specified wash and finishing process. Do not apply a generic shrinkage percentage to every material. Ask for the relevant material and sample assessment, record the wash condition and decide which finished measurements will govern the order.
Specify pockets, stripes and artwork independently
Write down pocket opening, depth, attachment and position. A reference with a small back pocket does not automatically communicate a secure phone pocket. Confirm whether pocket bags, drawcord ends and elastic construction need any particular detail.
For side stripes or leg graphics, mark width, spacing and placement on front, side and back views. State whether an effect is intended as a panel, applied tape, print or embroidery; the method should be reviewed against the selected material. Supply original artwork or material you are authorized to reproduce.
Review the sample with a repeatable checklist
- Measure the sample at the agreed points and record the actual result beside your requested value.
- Assess the garment on the intended fit model or against a suitable reference, noting waist position, seat room and leg shape.
- Check pockets, drawcords, waistband and hem construction for the intended use.
- Compare stripe paths, artwork scale and placement on both legs.
- Review the agreed wash or finishing result, then record changes before another sample or production approval.
Agree acceptable measurement tolerances for the specific points rather than writing “perfect fit” or applying one unexplained tolerance everywhere. If more than one size needs checking, define the size-set requirement before the production plan is confirmed.
Record revisions so the next version is clear
Number the sample or revision, date the comments and separate requested changes from details that are already approved. “Make it baggier” leaves several possible interpretations. A clearer comment identifies whether the change concerns hip width, thigh, knee, hem or rise and states the intended measurement.
Keep the revised measurement table, artwork and annotated reference together. For a coordinated set, approve the pants alongside the top so that color, fit balance and decoration are reviewed together. See the matching-set manufacturing page for top-and-bottom development requirements.
Prepare a quotation request for Boxiang
Send the chosen fit direction, front and back references, measurements or a reference garment, material preferences, artwork, sizes, quantity per color and delivery destination. Read the streetwear tech pack guide if you need help organizing the files.
Our MOQ is 50 pieces per style, per color. Basic sampling typically takes 7 days after payment of the sample fee and confirmation of complete design details. Bulk production typically takes 15–30 days after sample approval and receipt of the deposit. Confirm the schedule for your particular design; these production timings do not include transit.
Browse custom pants manufacturing and style references, then send your sweatpants brief for review. You can begin with references if a complete tech pack is not yet available; the missing details still need to be agreed before sampling.
Questions before sampling custom sweatpants
Can I send a retail size chart as the specification?
It can help explain the target audience, but confirm whether it describes body measurements or garment measurements. Add measuring locations, units, construction details and your intended fit rather than assuming the label size communicates all of them.
Does a wide-leg reference prove the pants are heavyweight?
No. Fit, fabric structure and finishing all affect appearance. Ask for the actual material options and weight before selecting the sample fabric.
Can sizes be mixed within one color?
Yes. Provide the quantity breakdown by size within the style and color, and agree the measurements and grading before production.
Have a question about your own design?
Share your reference, quantity per color and destination. Our team can review the relevant options for your order.
Discuss your projectExplore manufacturing options