A clear tech pack turns a streetwear idea into a sample a factory can understand and reproduce. It does not need to look like a luxury-brand document. For a first collection, a focused pack with accurate visuals, measurements and artwork is more useful than a long PDF filled with vague references.
This guide explains what to include when preparing a tech pack for a custom hoodie, T-shirt, pants, jacket or matching set. Use it as a working checklist before sampling—not as a substitute for approving a physical sample.
What a tech pack does—and what it does not do
A tech pack is the project brief used to align the brand and manufacturer. It gives the team a consistent reference for construction, fit, decoration, labels and packaging. When details are written down before sampling, there is less need to interpret a mood board or chase decisions across separate chat messages.
It is not a guarantee that every material, trim or process is available at your target quantity. A good manufacturer reviews the pack, confirms what is feasible, flags open points and then develops the sample. Fabric availability, color minimums, special trims and timing are confirmed for the individual order.
Start with one style, one version and one source of truth
Create one pack per style. A hoodie and its matching pant may share artwork and fabric direction, but each needs its own construction and measurement information. Give every document a style name or internal code, a version number and a date. For example: BX-HOOD-01, V1, October 2026.
When you change a sleeve, print placement or size chart, update the version and mark what changed. This simple habit prevents an old image or measurement sheet from being treated as the latest instruction. Send one complete package rather than a folder of unnamed screenshots.
The essential pages for a custom streetwear tech pack
- Cover page: brand name, style code, garment type, revision date and your main contact.
- Flat sketches: front, back and side views that show seams, panels, pockets, hood shape, closures and rib areas. Hand sketches are acceptable if they are clear.
- Reference page: photographs or links that communicate the intended fit, finish or design direction. Label exactly what you like about each reference.
- Bill of materials: list the body fabric direction, rib, lining, labels, drawcords, zippers, buttons, patches and packaging. Mark unknown items as “factory to propose.”
- Measurement spec: a size chart with points of measure and tolerances where you have them.
- Artwork pages: production-ready artwork, placement dimensions, colors and print or embroidery direction.
- Label and packaging page: woven label, care label, hangtag, polybag, folding and carton requirements.
For a small first order, this can be a concise PDF. What matters is whether a person reading it can identify the style, locate every requirement and know which details still require confirmation.
Draw the garment before describing it
Flat sketches are more practical than fashion photographs for communicating construction. Use simple outlines and point arrows to call out details: dropped shoulder, kangaroo pocket, double-layer hood, zipper guard, curved hem, cargo pocket, elastic cuff or contrast panel. Add close-up callouts for any area that could be misunderstood.
If you only have inspiration images, annotate them. Instead of saying “make this oversized,” write “use this body width, but make the body 5 cm shorter,” or “keep the hood depth, remove the front graphic.” This gives the sample team a decision they can act on.
Build a measurement chart that can be checked
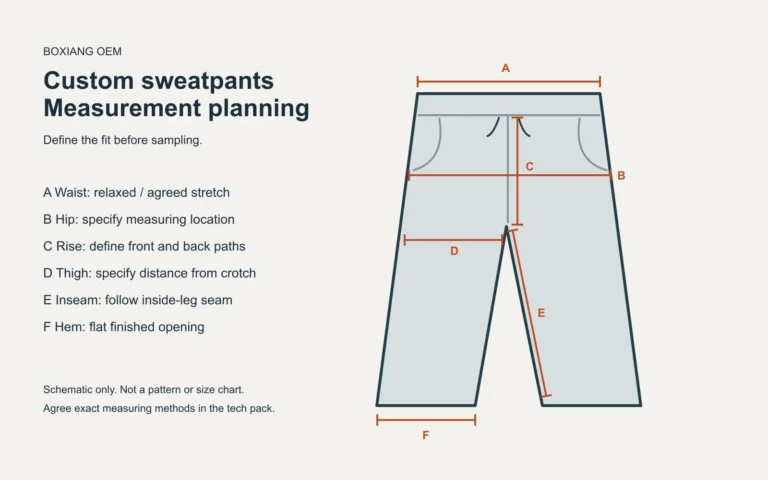
A measurement chart should identify the point being measured, not only a list of numbers. Add a drawing with numbered arrows, then use the same numbers in the chart. Typical points for a hoodie include body length, half chest, shoulder width, sleeve length, bicep, cuff opening, hem opening and hood height. Pants generally need waist, hip, rise, inseam, thigh, knee and leg opening.
| Point of measure | How to specify it | Why it matters |
|---|---|---|
| Half chest | State where it is measured and whether it is laid flat. | Controls the body width and oversized feel. |
| Body length | State the start and end points. | Prevents a cropped or overly long result. |
| Sleeve length | State shoulder seam or neck point to cuff. | Ensures the measurement method is consistent. |
| Leg opening | State flat opening or circumference. | Changes the silhouette of pants and joggers. |
Use a real reference garment when possible. Measure it carefully, photograph each measurement point and say what you want to change. A factory can then develop a size chart rather than guessing from an unmeasured image. For an oversized style, describe the intended relationship between shoulder, chest and length—not just one larger chest measurement.
Specify fabric direction without making unsupported assumptions
State what you know: preferred composition, target hand feel, inside finish, color, intended season or reference swatch. If you know a GSM target, include it; if you do not, describe the intended result and ask for suitable options. Do not assume that a fabric name in a product photograph proves its exact composition, weight or finish.
For hoodies and sweatshirts, a practical direction might be “compare an unbrushed loopback option with a brushed interior option, then select after reviewing swatches.” Our French terry vs fleece guide explains the questions to ask when choosing between those constructions.
Specify each contrast material separately. The body, rib, lining, patch and pocket bag may have different requirements. If color must match across components, mark it as a sample approval item rather than assuming it will match automatically.
Prepare artwork for production, not just presentation
Provide the original artwork file when available. Vector files are especially useful for clean logos and typography; high-resolution transparent PNG files can help where vector artwork is not available. State the physical print or embroidery size in centimeters or inches, its placement from a stable garment point, and the number of colors.
For each placement, include a small garment outline with dimensions. “Large back print” is subjective; “28 cm wide, centered 8 cm below back neck seam” is actionable. For embroidery, show the final size and desired location, then inspect the actual stitched sample for edge quality, backing feel and fabric distortion.
Artwork should be reviewed together with the selected fabric and finishing process. A decoration that looks right on a flat digital mockup can behave differently on a washed surface, a textured fabric or a stretchy rib. See the customization section for a starting overview of decoration details.
Do not overlook labels, packaging and trims
Small components shape the finished impression. Put label placement, size label information, care-label content, hangtag attachment and packaging requirements in the pack. If you have artwork for a woven label or hangtag, identify its dimensions, colors and placement. If you do not have it ready, mark it as an open item instead of leaving it out.
For hardware or special trims, include close-up references and state what is essential: finish, color, puller shape, logo treatment or function. Exact custom trims may have their own availability and minimum requirements, so ask early when they are central to your design.
Use the sample stage to close open decisions
Your sample is where the tech pack becomes a garment. Review it against the latest pack, not against memory. Check measurements, fit, fabric surfaces, artwork, color, labels, trims and finishing. Put requested changes in one written revision list with photographs. Confirm the corrected version before bulk production.
Boxiang’s basic sampling is approximately seven days after the sample fee is paid and complete design information is confirmed. Bulk production is generally 15–30 days after sample approval and receipt of the deposit. Complex styles or processes can require longer, so confirm timing for your specific order. Our MOQ guide explains why quantity per color also belongs in the project brief.
A final send-to-factory checklist
- Style code, version number and revision date are visible.
- Front and back sketches identify construction details.
- Size chart has clear points of measure and a base size.
- Fabric, rib, trims and finishing are either specified or marked for proposal.
- Artwork files, dimensions, placement and colors are supplied.
- Labels, packaging, quantity per color and destination are included.
- Open questions are listed so the manufacturer can respond before sampling.
Frequently asked questions
Can I start without a professional tech pack?
Yes. A clear reference, measurement direction, artwork and quantity are enough to start a discussion. The goal is to identify missing information before sampling, then build a more complete approval record as the project develops.
Can one tech pack cover several colors?
It can cover colorways of the same approved style, provided every color-specific artwork, trim or label change is clearly identified. Quantities should still be listed per color.
What should I send to request a quote?
Send the current tech pack or reference images, quantity per color, destination, artwork and any timing requirements through our custom quote form. If your pack is incomplete, say which details you would like the factory to propose.
The practical takeaway: a tech pack is a conversation tool. The clearer the visual, measurement and artwork decisions are before sampling, the faster you can focus the sample review on the details that matter to your brand.
Apply the brief to pants development
For a jogger or wide-leg sweatpant project, use the sweatpants measurement and sample checklist to prepare measuring locations and review the actual sample. It connects the general development steps above with the waist, rise, leg shape and hem decisions needed for pants.
Have a question about your own design?
Share your reference, quantity per color and destination. Our team can review the relevant options for your order.
Discuss your projectExplore manufacturing options